
How to Set Up the ErgoTune Supreme V3 for Your Body (Step-by-Step Guide)

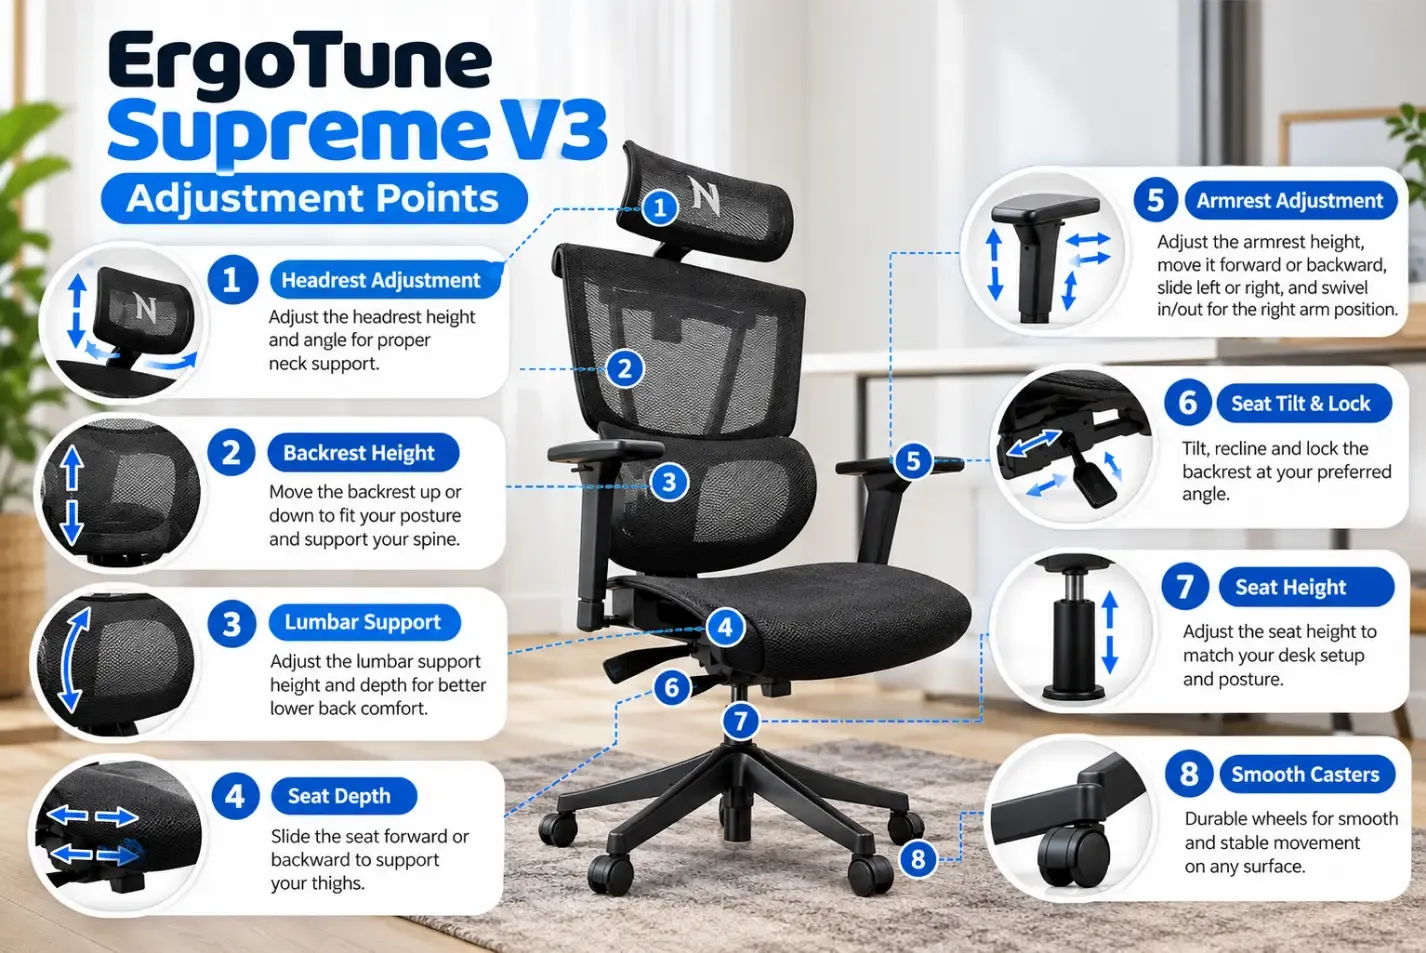
Quick answer: To set up the ErgoTune Supreme V3, adjust it from the bottom up: seat height, seat depth, backrest height, lumbar height, lumbar tension, armrests, recline tension, recline lock and finally the headrest. Each setting affects the next, so following this order avoids re-adjusting.
An ergonomic chair only helps if it fits your body. The Supreme V3 has many adjustments, and changing them at random can be confusing. This ErgoTune Supreme V3 setup guide walks through each one in order.
What Can You Adjust on the ErgoTune Supreme V3?
According to ErgoTune’s product information, the Supreme V3 has 13 adjustment points across six areas:
| Area | Adjustments |
|---|---|
| Headrest | Height, depth, angle |
| Backrest | Height |
| Lumbar (ATLAS) | Height, tension (3 settings) |
| Armrests (GyroBrace) | Height, width, pivot |
| Recline | Tension, lock |
| Seat | Height, depth |
That can feel overwhelming at first. Start with your feet and seat, then move up through the backrest and lumbar support, and finish with the armrests, recline and headrest. Before you begin, make sure you ordered the right size; our Supreme V3 sizing guide explains the height ranges.
Step-by-Step ErgoTune Supreme V3 Setup
1. Adjust the Seat Height First
Seat height affects your legs, feet, knees and how you relate to your desk, so it comes first. Sit all the way back and place both feet on the floor. Then adjust until your feet rest flat, your knees are level with or slightly below your hips, your thighs feel supported and your shoulders stay relaxed when your arms are on the desk. Do not leave your legs dangling just to match a high desk. If you must raise the chair, a footrest can restore foot support.
2. Adjust the Seat Depth
Sit fully back and check the gap between the seat’s front edge and the back of your knees. A good starting point is about two to three finger-widths of clearance. If the seat is too deep, the front edge may press behind your knees and your lower back may lose contact with the lumbar support. If it is too shallow, your thighs may not get enough support. Shorter users should pay the most attention here, and if you fall between sizes, consider your leg length as well as your height.
3. Adjust the Backrest Height
Sit normally and let your back rest against the chair. Raise or lower the backrest until your lumbar region and upper back feel naturally supported. Do not just pick the highest or lowest setting. You should not have to keep shifting your shoulders or lower back to find support.
4. Set the Lumbar Support Height
The Supreme V3 uses its ATLAS lumbar system. Sit fully back, find the natural inward curve of your lower back and adjust the support so it sits within that curve. You should feel support without being pushed into an exaggerated posture. If it presses on the wrong spot, change the height before touching the tension.
5. Adjust Lumbar Tension
Once the height is right, set the tension. The Supreme V3 offers three settings that control how firmly the support presses on your lower back. Start with the lowest, sit normally for several minutes and increase gradually if you want more pressure. Maximum tension is not automatically the most ergonomic. If it feels too strong, check that it sits in the curve of your lower back and that the tension is not set too high.
6. Adjust the GyroBrace Armrests
- Height: let your arms hang naturally and bend your elbows to about 90 degrees. If your shoulders shrug upward, the armrests are too high; if you reach down for them, they are too low.
- Width: match your natural typing position, with elbows fairly close to your body.
- Pivot: angle them so your forearms rest naturally while typing or using the mouse. Do not force your wrists or elbows into position.
7. Set the Recline Tension
Sit normally and lean back slowly. If the chair pushes you forward, the tension is likely too high. If the backrest moves too freely, increase it. The right setting depends on your body weight, preferred posture and how often you recline.
8. Decide Whether to Lock the Recline
The Supreme V3 lets you lock the recline position. A more upright locked position may suit focused work like typing, while reading, meetings or breaks may call for free recline. Changing posture periodically is often more practical than staying fixed for hours.
9. Adjust the Headrest Last
The headrest adjusts in height, depth and angle. It does not need to touch your head while you type, since its main job is supporting you when you recline. If it pushes your head forward while you work, move it back. To set it for reclining, lean into your usual reclined position and adjust it to cradle the back of your head without forcing your neck into an unnatural angle.
Common Setup Mistakes
- Leaving lumbar at maximum tension from the factory setting.
- Setting armrests too high, which lifts the shoulders.
- Ignoring seat depth, especially for shorter users.
- Choosing the wrong size. The Supreme V3 comes in small, medium and large for different height ranges.
Give yourself a few days before making final changes. Your body needs time to adjust to a better position, and small tweaks after real work sessions usually beat a perfect setup in the first five minutes. Revisit the settings if you change desks, shoes or posture habits.
Quick Setup Checklist
- Seat height: feet flat, knees level with or below hips.
- Seat depth: two to three finger-widths behind the knees.
- Backrest height: supports lower and upper back.
- Lumbar height and tension: in your lower-back curve, start low.
- Armrests: elbows at about 90 degrees, shoulders relaxed.
- Recline tension and lock: supportive without pushing you forward.
- Headrest: supports your head when reclining.
If you are setting up the chair to ease lower back strain, read whether an ErgoTune chair is good for back pain. Once your chair is set up, see how it performs for everyday comfort in our full ErgoTune Supreme V3 review, compared with Hinomi and NextChair. You can also see how it ranks in our Nextchair review roundup.
Frequently Asked Questions
How many adjustment points does the ErgoTune Supreme V3 have?
ErgoTune’s product page lists 13, covering the headrest, backrest, lumbar, armrests, recline and seat.
What should I adjust first on the Supreme V3?
Seat height. It affects your legs, feet and desk position, and most other settings depend on it.
Why does the lumbar support feel too strong?
It may be set to high tension or positioned too low. Move it into the curve of your lower back and reduce the tension.
Should the headrest touch my head while typing?
Not necessarily. It is mainly for support when you recline. Pushing your head forward while typing can strain your neck.
How much clearance should I leave behind my knees?
Aim for about two to three finger-widths between the seat’s front edge and the back of your knees.